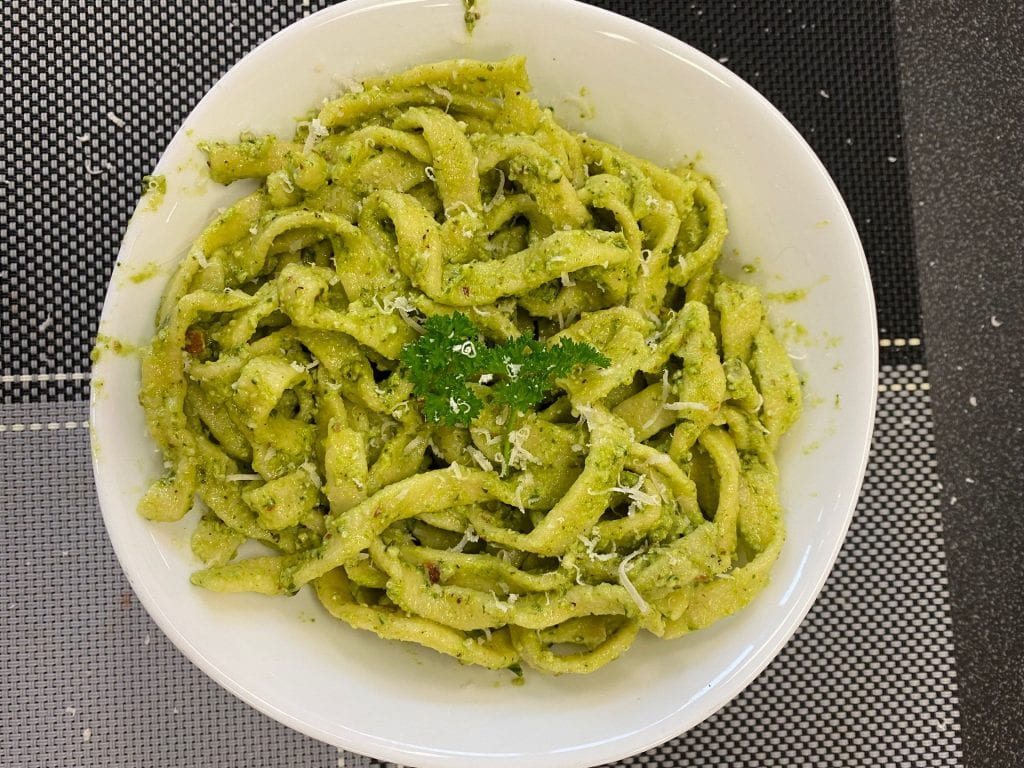
On Nov. 19th and 20th we made pesto pasta. Yesterday we made the pasta dough and the pesto sauce, just like we did last time. Today we rolled out the pasta dough with a pasta maker and then cut the pasta into noodles. My partner and I made sure to take safety precautions especially with he pasta maker. We made sure to continuously dust the dough with flour so that it didn’t stick together. We boiled a large pot of water on high and then started to cook the pasta, it cooked for about 2 minutes before we drained the water. We stirred 3 scoops of the pesto sauce into the pasta and then grated fresh parmesan overtop. This pasta was amazing, especially the pesto sauce that we made. I would give this pasta a 6/10 for nutrition because it could be healthier by adding veggies and protein. I would for sure make and eat this again because it was one of the best pastas I have ever had. The pasta was a huge success and we didn’t run into any problems. My partner and I communicated very well today and finished very early.
On Nov. 16 we made handmade pasta in foods class. We mixed water, oil, an egg, salt and flour together in a kitchen aid mixer. Once the dough had all mixed together we needed it with our hands until it was smooth and not sticky. We tightly wrapped the dough in plastic wrap and let it sit in the fridge over night.
The next day we used the handmade pasta dough to make carbonara. We used a pasta maker to stretch the pasta out so that it was in a thin long rectangle shape, and then we began to cut the pasta into thin spaghetti noodles. In order to make sure that the noodles didn’t stick together we continuously dusted them with flour. During this we also cooked bacon and garlic over medium heat and scrambled an egg and egg yolk together with grated parmesan cheese. Once the water was boiling rapidly we cooked the spaghetti noodles for about 2 minutes and then drained the pasta water into a liquid measure. Next we added the pasta into the bacon and then poured the egg mixture slowly overtop. We had to stir the pasta all together at a fast pace to make sure that the eggs didn’t scramble, we added some of the pasta water to make sure that the egg mixture still stayed as a sauce.Finally we topped it with parsley and extra grated parmesan. We had to take extra caution with using a pasta maker and using so many pots and pans on the hot stove. Overall this pasta was amazing, rich and creamy so I would definitely eat it again. I would give it a 5/10 for nutrition because it is not a very healthy pasta because of the cream mixture and parmesan but since it is homemade pasta it is healthier then at a restaurant.
Today in foods class we made Risotto. This was relatively easy to make, in our risotto we decided to put tomatoes and basil as well as rice, onions and some sweet potato. We made sure to be careful while using the stove today because we would be using a lot of different burners and pans. After we cut up the veggies we started to sauté them in our cast iron frying pan for about 6 minutes. We also started to cook our rice in a pot and added in chicken broth, and cooking it for about 24 minutes. We then added the rice into the veggies and stirred everything together. Once everything was done cooking we topped it all off with parmesan and parsley. This dish was very colourful and looked very healthy and amazing. I would give it a 8/10 for nutrition because it has lots of veggies in it as well as rice! I would make this again but next time I wouldn’t use as much tomatoes because I don’t like them that much.
The next day we also decided to make risotto balls with our leftover risotto which tasted amazing!
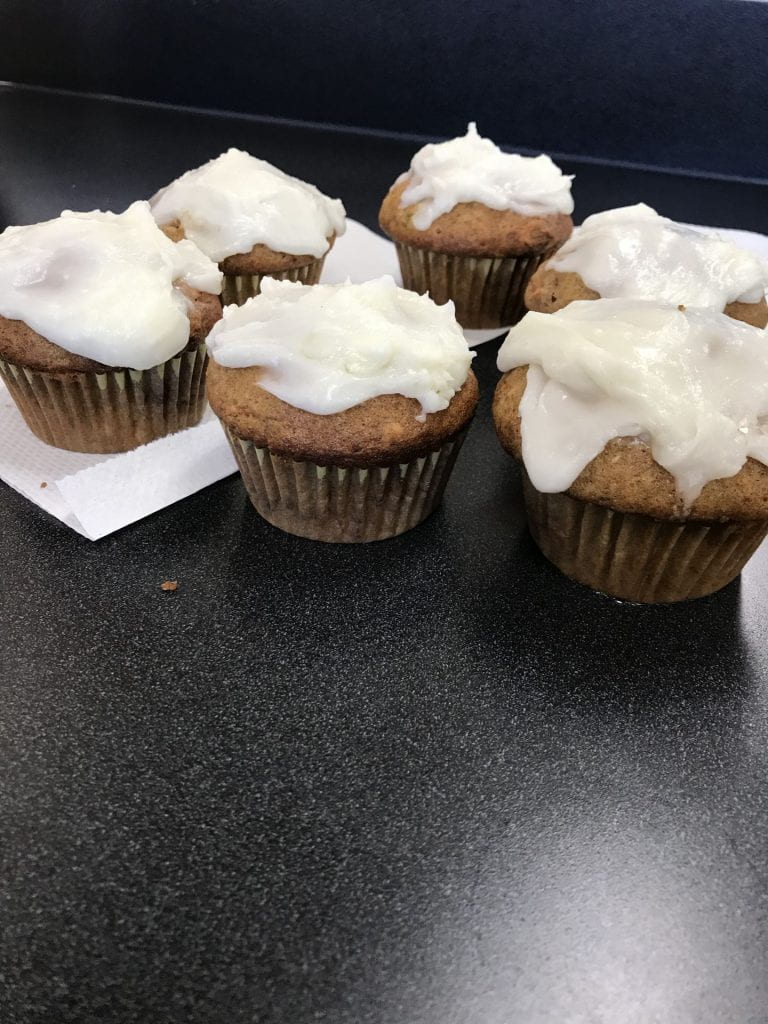
On Nov. 5th we made carrot muffins in foods class. These muffins were so good. They were so moist, creamy and surprisingly sweet which was an amazing combination. I started off by doing the safety and sanitation rules and then I pre-heated the oven to 350 degrees. After I collected the ingredients from the supply table I mixed the egg, vanilla, sugar, oil and buttermilk together in a large bowl. After that grated the carrots and then added the carrots, coconut and pineapple into the bowl. In a separate bowl I sifted the flour, baking soda, cinnamon and salt together and then added it into the large bowl. Since I was following the muffin method I made sure to not over mix the batter. The muffins baked in the oven for 25 minutes while I made the icing out of cream cheese, butter and icing sugar. Once the muffins had come out of the oven and cooled for a bit I frosted the muffins. It was challenging to ice the muffins and have it still look pretty, my muffins also didn’t turn out very good because I think I added too much sugar. They didn’t rise and the batter spilled over the muffin tray. I would give this recipe a 5/10 for nutrition because it has less sugar and other sweet ingredients then a typical muffin from a store would. Overall the muffins still tasted amazing, even though I had messed up the recipe. By adding coconut and pineapple to the batter it made them taste sweet and fruity, which paired great with the carrot flavour!
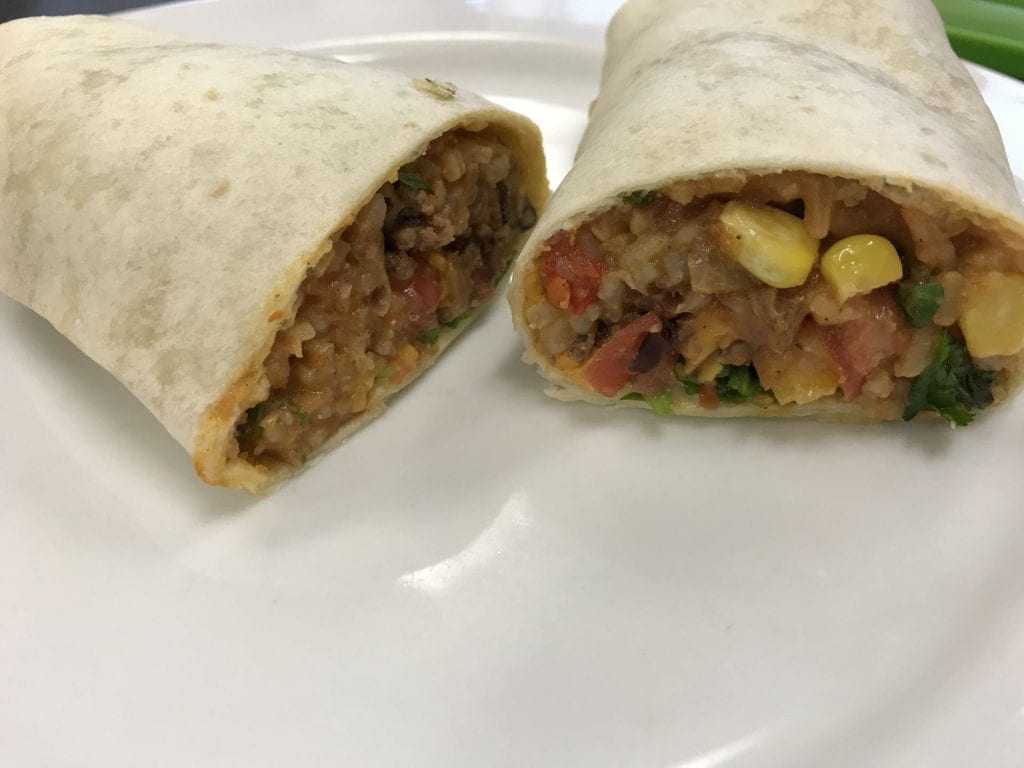
On Nov.3rd we made burritos in foods class. The day before we made Spanish rice, so we used some of the rice in the burritos as well. These burritos were amazing, they had the perfect amount of spice and sweetness. We started by washing our hands and then I picked up beef, peppers, lime, cheese, tomato, arugula, cilantro, beans, onion and a variety of spices and seasonings. My partner set up the kitchen and chopped all the veggies while I heated up two cast iron pans. I cooked the onion with the spices for a few minutes before adding in the beef and mixing it all together. While that was cooking in one pan I added the Spanish rice to the other pan with olive oil and a bit of water and heated that up as well. Once the beef and onions had almost finished cooking we added the black beans and tomatoes into the mixture and kept cooking it until it was ready. Meanwhile we washed and dried all the dishes and by the time we were done that the leftover Spanish rice and the beef mixture was finished cooking. We removed both pans from the heat and then heated up two tortillas in the microwave for about 15 seconds each. Finally we built our burritos by putting the Spanish rice on the bottom followed by the beef mixture, peppers, shredded cheese and then a garnish of lime, cilantro and arugula. We wrapped the burritos tightly and then ate them, they had so much flavour and were very bright and colourful. I would give these burritos a 6/10 for nutrition because they did have a lot of veggies and protein but to make them healthier we could have used whole wheat tortillas instead of white and chicken instead of beef. They are still a lot healthier then a burrito you would buy at a Mexican restaurant though. Throughout todays cooking we didn’t run into any challenges and the burritos were a big success. We made sure to take safety precautions when cutting the veggies and using the stove and microwave. These burritos would have tasted even better if we had added sour cream to the top!
On Nov. 2nd we made Spanish rice in foods class. I started by following the safety and sanitation rules and then got out all the equipment I would need to make todays recipe. I collected a variety of spices from the supply table as well as rice, corn, black beans, carrots, celery, onion, pepper, tomatoes, garlic and chicken broth. My partner started by sifting the rice and running it under cold water until it ran clear, while I finely diced all the veggies we would be using. After that we heated a large cast iron pan with olive oil over medium heat and then added in the diced carrots, onions, celery and pepper. Once the onions turned clear we added in the rice followed by the garlic and spices. We sautéed them for about 2 minutes and then added in the tomatoes and chicken broth mixed with water. I covered the cast iron pan with a lid and turned the heat to low so that the mixture could simmer. While it was cooking for about 15 minutes we washed and dried all the dishes and stirred the rice every 2 minutes to make sure it didn’t burn. When the rice was almost done we added in the corn and black beans and mixed everything together. Finally we garnished the top with cilantro and feta cheese. This dish met the product standards by being full of flavour and very colourful, throughout cooking today we also made sure to safely use the stove and the knives when we were cutting things. This recipe gets an 8/10 for nutrition because it is full of veggies and has rice, it would be even healthier for you if you used brown rice instead of white. This would also have tasted very good if we had added sour cream to the top, overall I would eat this again but next time I would add less tomatoes and not as much spices.
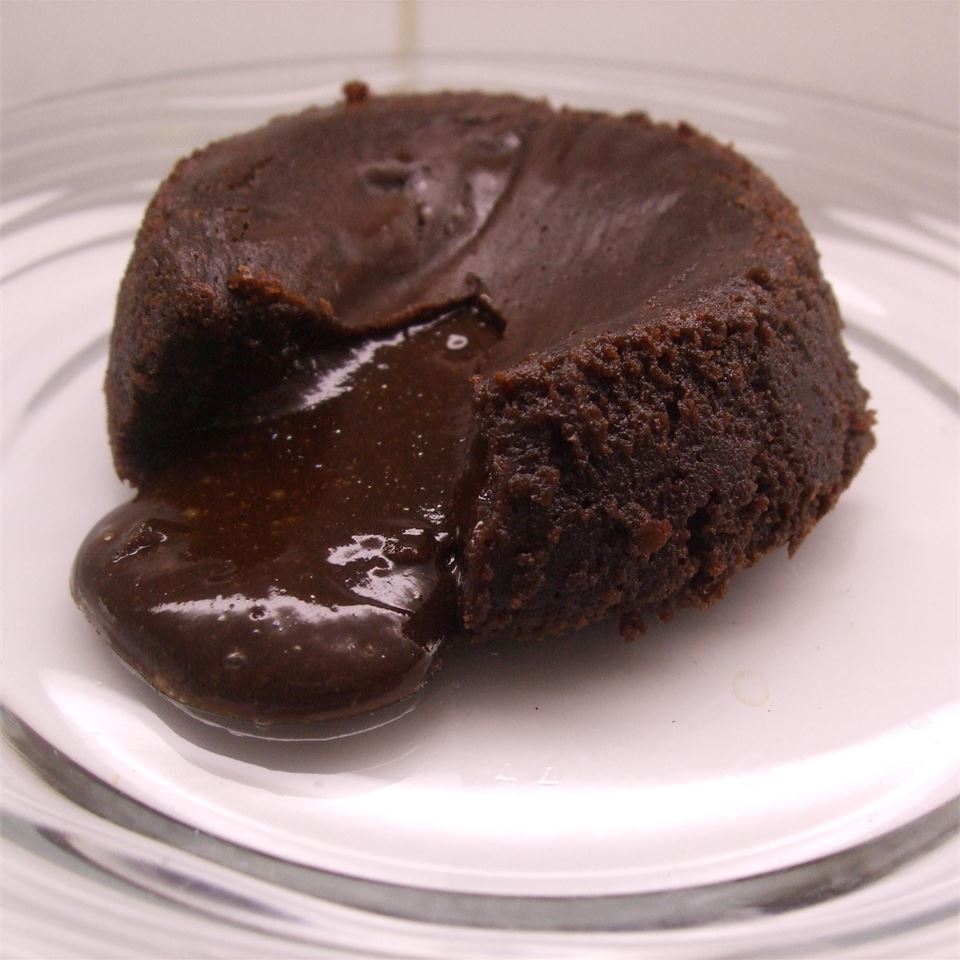
On Oct. 15th we did a lab test for chocolate lava cakes. This was a very easy recipe to make, I got my ingredients from the supple table, washed my hand and got out my equipment. I started by microwaving the chocolate chips and butter in the microwave in 20 second intervals until it was quiet melted. I also preheated the oven to 400 degrees and lightly greased 2 small ramekins with butter and cocoa powder. When the chocolate and butter was melted I stirred it together one last time with a rubber spatula and then cracked an egg in a 500ml liquid measure. I beat the egg with an electric mixer for about 2 minutes until it was pale and foamy and then gradually added in the sugar and salt and continued to beat it until it was thick and pale. I stirred in the vanilla and then scraped the egg mixture into the chocolate mixture and combined it all with a rubber spatula until it was just incorporated. I divided the batter into the 2 ramekins which was somewhat of a challenge and put them in the oven for about 11 minutes. When I took them out of the oven the smelt rich and chocolatey and when I ate them they were soft and moist on the inside which met the product standards. I then washed and dried the dishes, I would give these lava cakes a 5/10 for nutrition because they are healthier then a cake you would get at a restaurant and they have less chocolate and sugar. I would eat and make these again because they tasted pretty good, they would be even better if you added vanilla ice cream or whipping cream on top!
On Oct. 23 I did my breakfast home lab, this was so much fun because I got to choose any 3 breakfast recipes to make. I looked through Pinterest to see if I could find any unique breakfast recipes and then I came across a breakfast hash, blueberry oat spinach smoothie and avocado toast. The day before making these recipes I made a list of everything I would need and went to the grocery store to get all the items.
Avocado Toast: to make the avocado toast I would need one avocado and two pieces of bread since this recipe is for two people. I also drizzled olive oil overtop of the avocado toast as well as salt+pepper and everything bagel seasoning. I started by getting two pieces of bread and putting them in the toaster, while they were toasting I mashed the avocado in a small bowl with a fork and then mixed in the salt and pepper. When the toast was out of the toaster I let the pieces cool for a few minutes before adding half of an avocado to each piece of bread. Lastly I sprinkled everything bagel seasoning overtop of the avocado toast and drizzled on olive oil as well. This avocado toast was so good, I had already eaten this before because I have avocado toast quit regularly but it tasted even better with all of the seasonings on it and it paired so well with the breakfast hash. I would give it a 7/10 for nutrition because it has healthy fats from the avocado and I used gluten free bread.
Breakfast Hash: this breakfast hash was the best thing that I made! To make it I needed eggs, potatoes, bacon, sausages, shredded cheese, and onions. I also added in peppers and mushrooms for extra veggies. I started by heating up a cast iron frying pan on medium heat with olive oil, while it was heating up I washed, peeled and chopped my potatoes into small cubes and then added them into the pan. I also chopped the onions, mushrooms, peppers, sausage and bacon. Once the potatoes had started to cook I added in the veggies and let all of that cook for a bit, meanwhile I whisked together four eggs and after added in the bacon and sausage. Once everything was almost cooked I added in the four eggs and then scrambled everything together. Lastly I sprinkled the shredded cheese overtop and also added some chives, garlic, salt and pepper to season. This tasted so savoury and amazing, I would give it a 4/10 for nutrition because it has quite a lot of oil and grease but it also has some veggies, I would defiantly eat this again because it was unlike anything I had ever eaten before. And it would also have tasted great if I had put arugula underneath it
Blueberry Oat Spinach Smoothie: this smoothie was absolutely amazing, I usually only have strawberry banana smoothies so it was nice to try something different and you can’t taste the spinach at all. For this recipe I would need frozen blueberries, spinach, oats, bananas and almond milk. All I had to do was add all the ingredients to the blender and mix until combined. This smoothie mixed together so well so I didn’t add any yogurt because it was already at the desired consistency. It gets a 9/10 for nutrition because it has lots of fruit and it also has spinach in it, the smoothie would have tasted amazing if I had also added in peaches, mangoes or strawberries. But it was still excellent and I will for sure be making it again.
Overall I loved all of these recipes, the breakfast hash was a bit challenging to make because I had to cook so many ingredients all together and I had to make sure they didn’t burn. While making all of these recipes I had to take a lot of safety precautions because I was using a blender, the stove, the toaster, and large knives to cut up veggies. Each recipe paired great together and turned out very successful, my family loved all of them!
On Oct. 27th and 28th we made our own pizza dough and then put toppings on it and baked it all together. The first day I started off by making the pizza dough with yeast, flour, warm water, salt and sugar. I measured warm water into a liquid measure at eye level and then added the yeast and sugar In overtop of it, I let it stand for 8 minutes until the water was murky and pale. Once 8 minutes had passed I added the liquid mixture into flour and then mixed it all together in a standing mixer on speed 2 for about 2 minutes. I then began to add in the extra flour and continued to mix it for 8 minutes until the dough had all stuck together and it was not sticky and was smooth and shiny. The last thing for day 1 was to put it in a glass bowl and tightly put plastic wrap over it before refrigerating it overnight. On day 2 I brought the dough back to room temperature and preheated the oven to 550 degrees after following the safety and sanitation rules. I kneaded the dough on a lightly floured surface and then rolled it out with a rolling pin. Once the dough was thin enough I placed it on a cookie sheet and then spread tomato sauce and shredded cheese overtop. I baked the pizza for about 7 minutes and washed and dried all the dishes. When the pizza came out of the oven it smelled like and entire pizza factory and it was crispy and rich with cheese when I bit into it. This pizza gets a 7/10 for nutrition because it is healthier then a pizza you would get at a pizza place because it is homemade and has less flour, cheese and yeast in it. This pizza would have tasted even better if it had toppings like pepperoni, spinach, olives or pineapple on it!
On Oct. 28th we made Chocolate Crinkle Cookies. These were so chocolaty and rich and tasted amazing! I started by following the safety and sanitation rules and then preheated the oven to 365 degrees. I proceeded to collect my ingredients from the supply table including cocoa powder, icing sugar, 1 egg, butter and brown sugar. I then got out a sifter and a medium bowl and sifted all my dry ingredients together (flour, cocoa, baking soda and salt.) After that I creamed together the butter, egg and white and brown sugar in a large bowl until it was smooth and pale in colour. I added the dry ingredients into the wet and carefully stirred it all together with 5ml of vanilla and chocolate chips. After scraping the sides of the bowl with a rubber spatula I divided the dough in half twice and then formed small dough balls before rolling them in icing sugar. I lined a cookie sheet with parchment paper and put the dough on before putting it into the freezer to chill for 10 minutes. While the cookie dough was chilling in the freezer I washed and dried all the dishes and wiped down the counters and tabletop. The cookies then went in the oven for 10 minutes and when they came out the room smelt sweet and chocolaty. These cookies met the product standards by being hard and chewy on the outside and soft on the inside. I would defiantly eat these again because they tasted so good and I have never had a cookie like this before. They get a 6/10 for nutrition because they have less sugar then a cookie that you would buy at a bakery and they also use a combination of cocoa powder and chocolate chips.