Mac and Cheese

On Oct. 21st I did a makeup lab for Mac and cheese. This Mac and cheese tasted so rich and creamy with the old cheddar cheese. I started by washing my hands and then getting out all of my equipment + ingredients. I brought a large pot of water to a rolling boil on high, when it was boiling I added in the pasta and then stirred it occasionally for 7-9 minutes until the pasta was cooked. While the pasta was cooking I grated old cheddar cheese and finely diced and then sautéed onions in a cast iron pan. I then added flour, salt, pepper, mustard and hot sauce into the pot and cooked that for about 2 minutes. After that I added in the milk and whisked it all together consistently so that the sauce would thicken, this was somewhat of a struggle because it took a while for the sauce to thicken all together. I turned the heat down to low and then added in the cheddar cheese and stirred it until it melted into the sauce, finally I added in the pasta and stirred everything together. I decided to let the pasta cool for a bit while I washed and dried my dishes. The Mac and cheese was so thick and creamy with a velvety texture, it tasted amazing so I would for sure make this recipe again. I would give it a 6/10 on nutrition because it is healthier then a pasta you would order from a restaurant and it has real cheese opposed to Kraft dinner.

Waffles and Bacon

On Oct.13 I did a makeup foods lab for waffles and bacon because I was absent when we had made them. I started off by washing my hands and then got out all of my ingredients and equipment that I would need. I lightly greased my waffle iron with some pan spray and then preheated the iron to medium high. While the waffle iron was heating up I measured out all of the dry ingredients including whole wheat flour, white flour and baking powder and then whisked it all together. In a liquid measure I beat 1 egg and then added milk and oil into it, I then added the wet ingredients into the dry all at once and combined it together with a wooden spoon till it was moistened. By this time my waffle iron was hot enough to start cooking my waffles, so I took a 50mL dry measure and poured that much of the batter onto the waffle iron one at a time until all the batter was gone. I made sure that I was careful because I don’t use the waffle iron that much at home. I kept the waffles warm in the oven while I started to make the blueberry sauce which was just frozen blueberries with sugar and cornstarch. I cooked it all over medium heat in a small saucepan until the mixture was thick enough. I added the blueberry sauce overtop of the waffles and they looked and tasted amazing, the waffles were buttery and crispy and the blueberry sauce was sweet and fruity. I also served the waffles with some crispy bacon that I cooked in a cast iron skillet for about 7 minutes on the stove. after I ate this delicious meal I washed and dried all of my dishes and cleaned up the rest of my kitchen. I would give these waffles a 7/10 for nutrition because they have less sugar then a waffle you would order at a breakfast restaurant so I would eat them again for sure. Overall this was an easy at home foods lab to do and I didn’t run into any challenges.

Buddha Bowls

On Oct. 16th we designed and made our own buddha bowls! The day before we created our buddha bowls we got a list of a variety of different ingredients we could put in our buddha bowls. I decided to put rice, quinoa, carrots, cucumber, broccoli, beans, onions, chickpeas, arugula, hummus, feta cheese, avocado, hemp seeds and the dressing that Ms. Bolli made. These were very easy to make because the rice and quinoa were already cooked so all we had to do was cut up our veggies and sauté them. I started by doing the safety and sanitation rules and then got out all my equipment and collected my veggies from the supply table. While I heated up a small cast iron pan with olive oil and medium heat I cut up and diced my vegetables. When the pan was hot enough I started by cooking my onions, carrots and broccoli because they would take the longest. I also put my chickpeas in the oven to roast for about 10 minutes at 425 degrees. When the onions, carrots and broccoli were almost cooked I added the black beans into the pan and removed my chickpeas from the oven and added those in as well. While that finished cooking I washed and dried all the dishes and then grabbed a small bowl and heated up my rice and quinoa in the microwave for about a minute. I then started to put all the toppings on my buddha bowl. I wanted to make sure that my buddha bowl was colourful and flavourful as well as looking really pretty. After all the veggies, chickpeas and beans were on top of the rice I crumbled feta cheese overtop and then sprinkled on hemp seeds. Lastly I drizzled Ms. Bolli’s dressing overtop and added a scoop of hummus. This buddha bowl tasted amazing and fresh, I would give it a 9/10 on nutrition because it had a lot of veggies, protein and some carbs which made it very healthy. This was another one of my favourite things that we made in class so I would make this recipe again in the future. It would also have tasted amazing with kale, sweet potatoes or cauliflower!

Fruit Skillet Cake

On Oct. 13th we made fruit skillet cakes with pears as our fruit! This recipe was actually a lab test that we did today and it went a lot better then I was expecting. I hadn’t done a lab test since grade 9 so I was a bit nervous, but this fruit cake turned out amazing and it wasn’t hard to make at all. I started off by doing the safety and sanitation rules and then proceeded to carefully read my recipe so I 100% was sure that I knew what I was doing. I collected all the ingredients I needed from the supply table including butter, pears, brown sugar, an egg, buttermilk and a variety of spices. I set up my kitchen and got out all the equipment I needed as well as preheated my oven to about 400 degrees. I then started by buttering my 8 inch cast iron pan and then dusting it with a touch of flour. Next I whisked together flour, baking soda, baking powder, salt and nutmeg with all-spice and cinnamon in a large glass bowl. After that I beat together the butter and sugar in a large mixing bowl until it looked pale and fluffy, and then added the dry ingredients and the buttermilk into the wet mixture alternating between the two. I used my electric mixer to combine everything together, and then proceeded to thinly slice the pears and then poured my mixture into the cast iron pan. I fanned the pears out on top of the batter carefully, trying to make them look pretty and then topped it all off with more cinnamon and sugar. Lastly it went in the oven for 35-40 minutes and during that I washed and dried my dishes, when the timer went I removed the cake from the oven and let it cool for 5 minutes before cutting into it. The fruit skillet cake smelled sweet and fruity and was golden brown as well as looked so pretty making it definitely meet the product standards. It tasted absolutely amazing, which made it one of my favourite things we have made so far so I would eat it again for sure. I would give this pear cake a 6/10 on nutrition because it has less sugar then a typical cake and it also has a lot of fruit! Overall this lab test was a lot of fun even though I didn’t get to cook with my partner, the only challenging thing that I encountered was when I had to pour the batter into the skillet but other then that everything else was successful! This cake would have also tasted amazing if we had used apples or peaches as the fruit.

Eggs my way

How to make perfect, fluffy scrambled eggs

On Sept 24th we got to choose how we made our eggs, I was absent for this lab so I did it at home! Whenever I make eggs for breakfast I always eat them scrambled so that’s exactly what I did today. This was my first at home make-up foods lab of the year and it was very easy to do, I started by washing my hands and then cracking an egg into a small bowl. I used a fork to carefully whisk my egg until it was quite bubbly. Next I heated a bit of butter on a frying pan on medium heat and when it was warm enough I poured in the whisked egg and reduced the heat a bit. I then used a spatula to move the egg around the pan to make sure it was cooked, this took about 4 minutes. Lastly I seasoned the egg with salt and pepper and decided to serve it with toast. This egg met the product standards by being so fluffy with lots of large pieces. I would definitely eat this again because I eat it all the time and its very healthy because of the protein, so it gets a 10/10 on nutrition.

Rustic Bread

On Oct. 1st we made rustic bread to go with our shakshuka, this bread was so easy to make because all we had to do was follow the quick bread method, so we didn’t run into any challenges! There also is barely any ingredients in the recipe which made it a lot healthier then a typical bread format he grocery store. We followed the safety and sanitation rules and then I collected the ingredients from the supply table while my partner set up our kitchen. I started by sifting the flour with the yeast and salt into a large bowl while my partner measured warm water in a liquid measure at eye level. We poured the water into the flour mixture and then combined it with a wooden spoon until it looked “scraggy”. This bread takes two days to make so we covered it with plastic wrap and let the dough rest until foods class the next day, the day after all we had to do was dust the dough with a touch of flour and then preheat the oven to 450 degrees. We baked the bread for about 20 minutes with a lid over the casserole dish and then we took the lid off and baked it until it was golden brown. Once I removed the bread from the oven it smelled like an entire bakery, it was moist and soft on the inside while being crispy and crunchy on the outside. I would definitely make and eat this bread again because it was one of the best breads I have ever tasted. It also went really well with the shakshuka that we also made. I think that this bread would get a 7/10 on nutrition because it has hardly any sugar in it and it also doesn’t have a lot of other ingredients.

Shakshuka with Feta

On Oct. 2nd we made shakshuka with feta cheese, our goal was for the shakshuka to be rich and flavourful and very colourful. So we got all our ingredients from the supply table and started by prepping all our veggies. We then heated up a cast iron pan and started to sauté the onions, peppers and garlic in with the oil, cumin, paprika and cayenne for about 6 minutes. While that was cooking we cracked 2 eggs into separate custard cups. We then added in the tomatoes and waited until they had thickened before adding in the spinach and arugula. After adding in the rest of the veggies we tasted it and then seasoned it until it reached our desired taste. We made 2 deep “nests” in the tomato mixture and poured in 2 eggs which was a bit of a challenge because the mixture was so thick it was hard to separate it apart enough to add in the eggs. We then sprinkled the top with feta cheese and I took oven mitts and placed the cast iron pan of the shakshuka into the oven to bake for about 7 minutes. While it was baking I washed the dishes while my partner dried them and set the table. My partner also cut the rustic bread we had made the day before and put it on a plate to be served with our shakshuka. After the 7 minute timer had gone off I removed the cast iron pan from the oven and then we garnished the top with cilantro and basil. I think this recipe gets a 8/10 for nutrition because it has lots of veggies and protein as well as healthy fats. Our shakshuka met the product standards because it tasted very flavourful and rich, to make this recipe better we could have added in other different veggies as well like kale or avocado. This wasn’t the best thing we made in foods class because I am not the biggest fan of tomatoes or eggs when they are poached, so I wouldn’t make this again unless those things were changed.

Frittata

On Oct. 8th we made frittata which was my favourite foods lab so far! We of course started by doing our safety and sanitation and then I picked up all the ingredients my partner and I needed for today. I washed and sliced the potatoes as well as the other veggies while my partner started heating up a cast iron pan with oil. After cooking the potatoes we set them aside and then started to sauté the onions and later added in mushrooms. Once all of the veggies were cooked we scrambled two eggs and added them into the veggies and then crumbled cheddar cheese and feta overtop. I placed the cast iron pan in the oven to broil in 1 minute intervals, while the frittata was broiling in the oven my partner washed the dishes while I dried them and set the table. I took the frittata out of the oven and it smelled so amazing and looked golden brown, we decided to put arugula on our plates and then the frittata overtop. This recipe was so successful and met the product standards, I loved how it it tasted so savoury and looked so bright and colourful. I would give our frittata a 9/10 for nutrition because it has a lot of veggies and protein in it, to make this taste even better we could have added avocado or peppers! Overall this was my favourite thing we have made in foods class so far and I will definitely be eating it at home regularly!

Smoothie Bowls

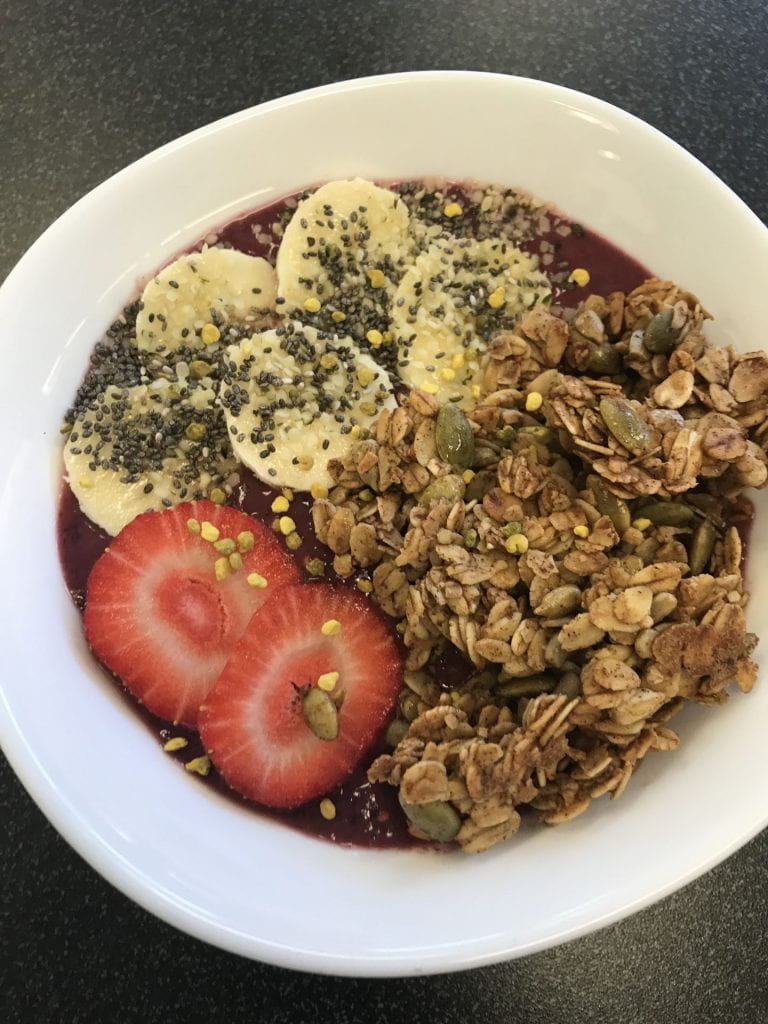
On Oct. 5th we made and designed our own smoothie bowls. This was also very exciting for my partner and I because we got to choose what we wanted to put in our smoothie as well as what we wanted our toppings to be! A few days before making our smoothie bowls we planned out what we wanted to put in our smoothie, we decided on a mixture of berries, mango, bananas, spinach and a dash of oat milk. We also wrote out step by step how we would make our smoothie bowls. The first thing we did the day of making our smoothie bowls was the 5 safety and sanitation rules and then my partner collected all the ingredients that we needed while I got out the equipment. The next thing we did was make our granola which we also got to design, in our granola we used oats, pumpkin and sunflower seeds, vanilla, cinnamon, oil and a bit of honey to make it sweet. After we mixed the granola together we put it in the oven for 15-25 minutes. Then we started to make the actual smoothie, inside the blender we put the bananas, spinach, frozen berries, mango and oat milk and blended it with extra caution because we hadn’t used the blenders yet in class. Once the smoothie was thick and radiant in colour I carefully cut up the bananas and strawberries for our toppings, while my partner collected chia seeds and some bee pollen for some extra colour on top. We removed the granola from the oven to let it cool and then washed and dried all the dishes and then poured the smoothie into 2 bowls and added all the toppings onto it. We chose these ingredients in hopes of the smoothie bowl tasting sweet and fruity and look very bright in colour, which it did. The granola was also sweet and crunchy and worked perfectly as another topping on our smoothie bowls. We both agreed that our smoothie bowl got a 10/10 because it tasted and looked exactly they we wanted it to. I would for sure make this exact smoothie bowl again. Overall this foods class day was very successful and we didn’t run into any challenges!

Breakfast Sandwiches

On Sept. 29th we designed and made our own breakfast sandwiches. This was very exciting because we got to choose what we put inside the breakfast sandwich as well as what we put in the scones! The day before we made them I planned out what I was going to put into my sandwich. I decided that inside the sandwich I would have bacon, a poached egg, arugula, avocado and some homemade hollandaise sauce. I also decided to mix cheese into the scones! The next thing I made sure I did was write out step by step how to make my sandwich, my goal was to make this breakfast sandwich very colourful and flavourful with taste as well as have it smell like an entire breakfast restaurant. I started the day of making the breakfast sandwich off by following the safety and sanitation rules and then collecting all the ingredients I needed to make it. The next thing I did was make my scones the exact same way I did last time but this time I added cheese into the mixture at the end before placing them in the oven. While the scones were in the oven I started to cook the bacon and then cut up the avocado and arugula. I put on oven mitts and carefully removed the scones from the oven, they were golden brown like last time but they now had a strong smell of cheese. When the bacon had been cooking on the stove for about 7 minutes I removed it and put it on a plate and then began to poach an egg. This was somewhat challenging because I never make poached eggs at home, when my egg was done cooking I created my hollandaise sauce which was so successful and tasted amazing. Then I assembled the whole sandwich together, it looked exactly how I wanted it to! It was so radiant in colour and felt soft and moist on the inside when I bit into it. I think my breakfast sandwich gets a 10/10 because it was so savoury and flavourful. I will definitely be using this recipe in the future. The last thing of the day that I did was wash, dry and put away the dishes.